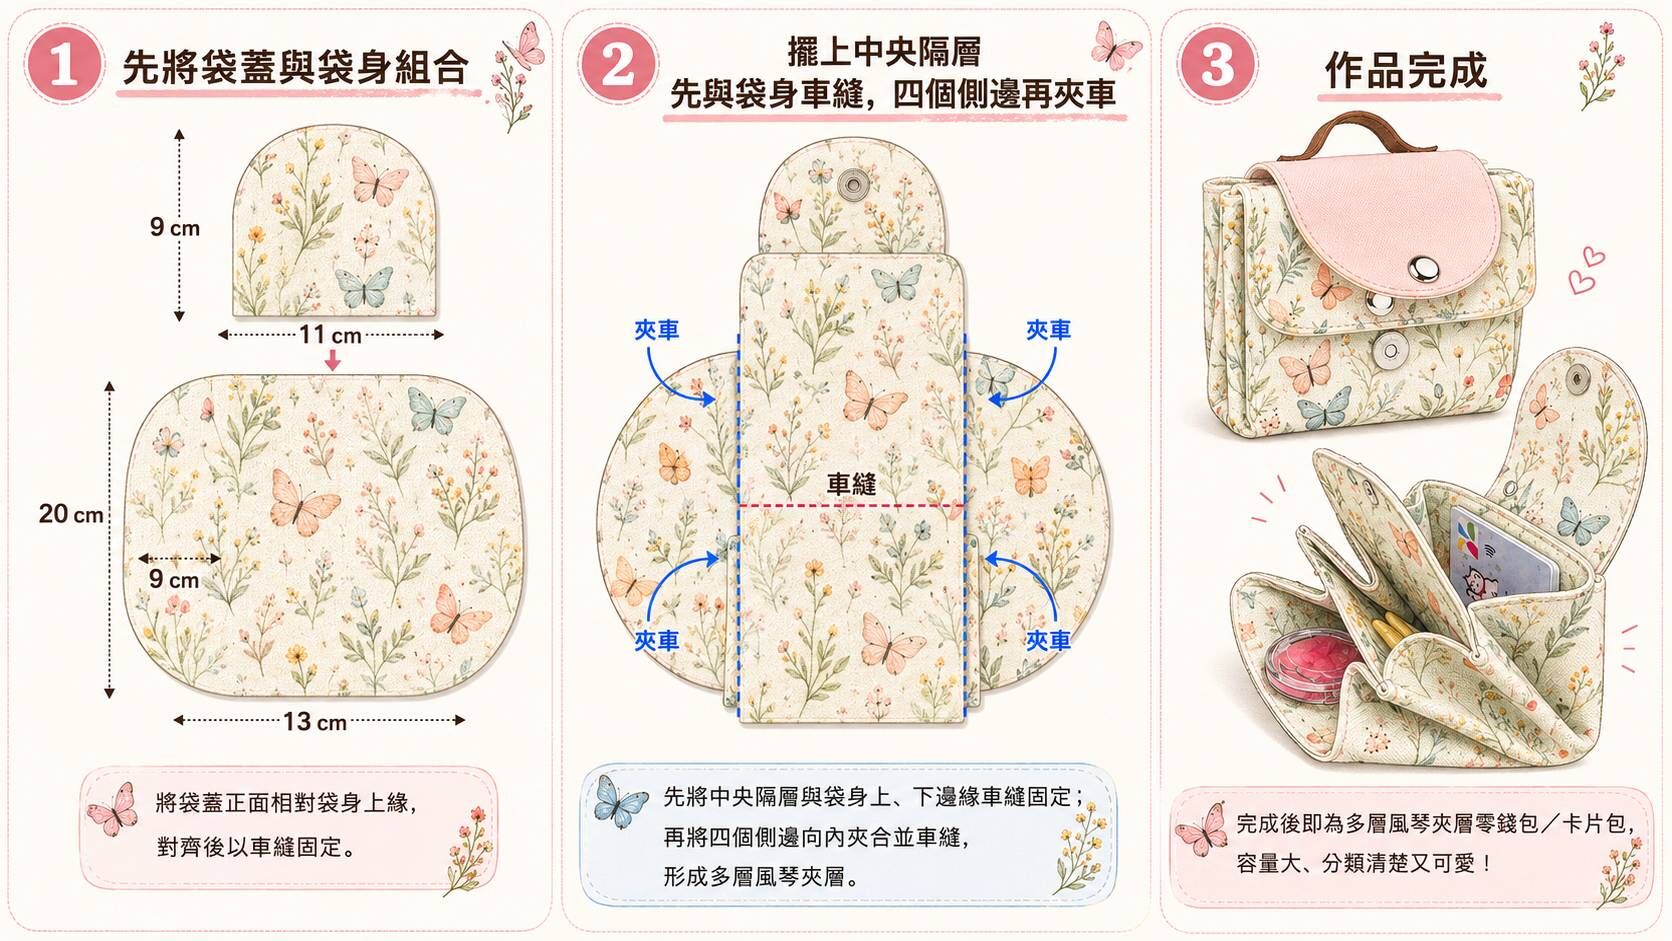
袋蓋正面相對袋身上緣
先確認正反面與中心位置,將袋蓋對齊袋身上緣,再以車縫固定,讓圓弧翻蓋落在正確方向。
Join the flap to the body
Match the right sides and centers, then stitch the flap to the upper body edge so the rounded cover faces the correct way.
{{ 'fb_in_app_browser_popup.desc' | translate }} {{ 'fb_in_app_browser_popup.copy_link' | translate }}
{{ 'in_app_browser_popup.desc' | translate }}
滿 NT$1500 享免運費|台灣限定
{{ childProduct.title_translations | translateModel }}
{{ getChildVariationShorthand(childProduct.child_variation) }}
{{ getSelectedItemDetail(selectedChildProduct, item).childProductName }} x {{ selectedChildProduct.quantity || 1 }}
{{ getSelectedItemDetail(selectedChildProduct, item).childVariationName }}
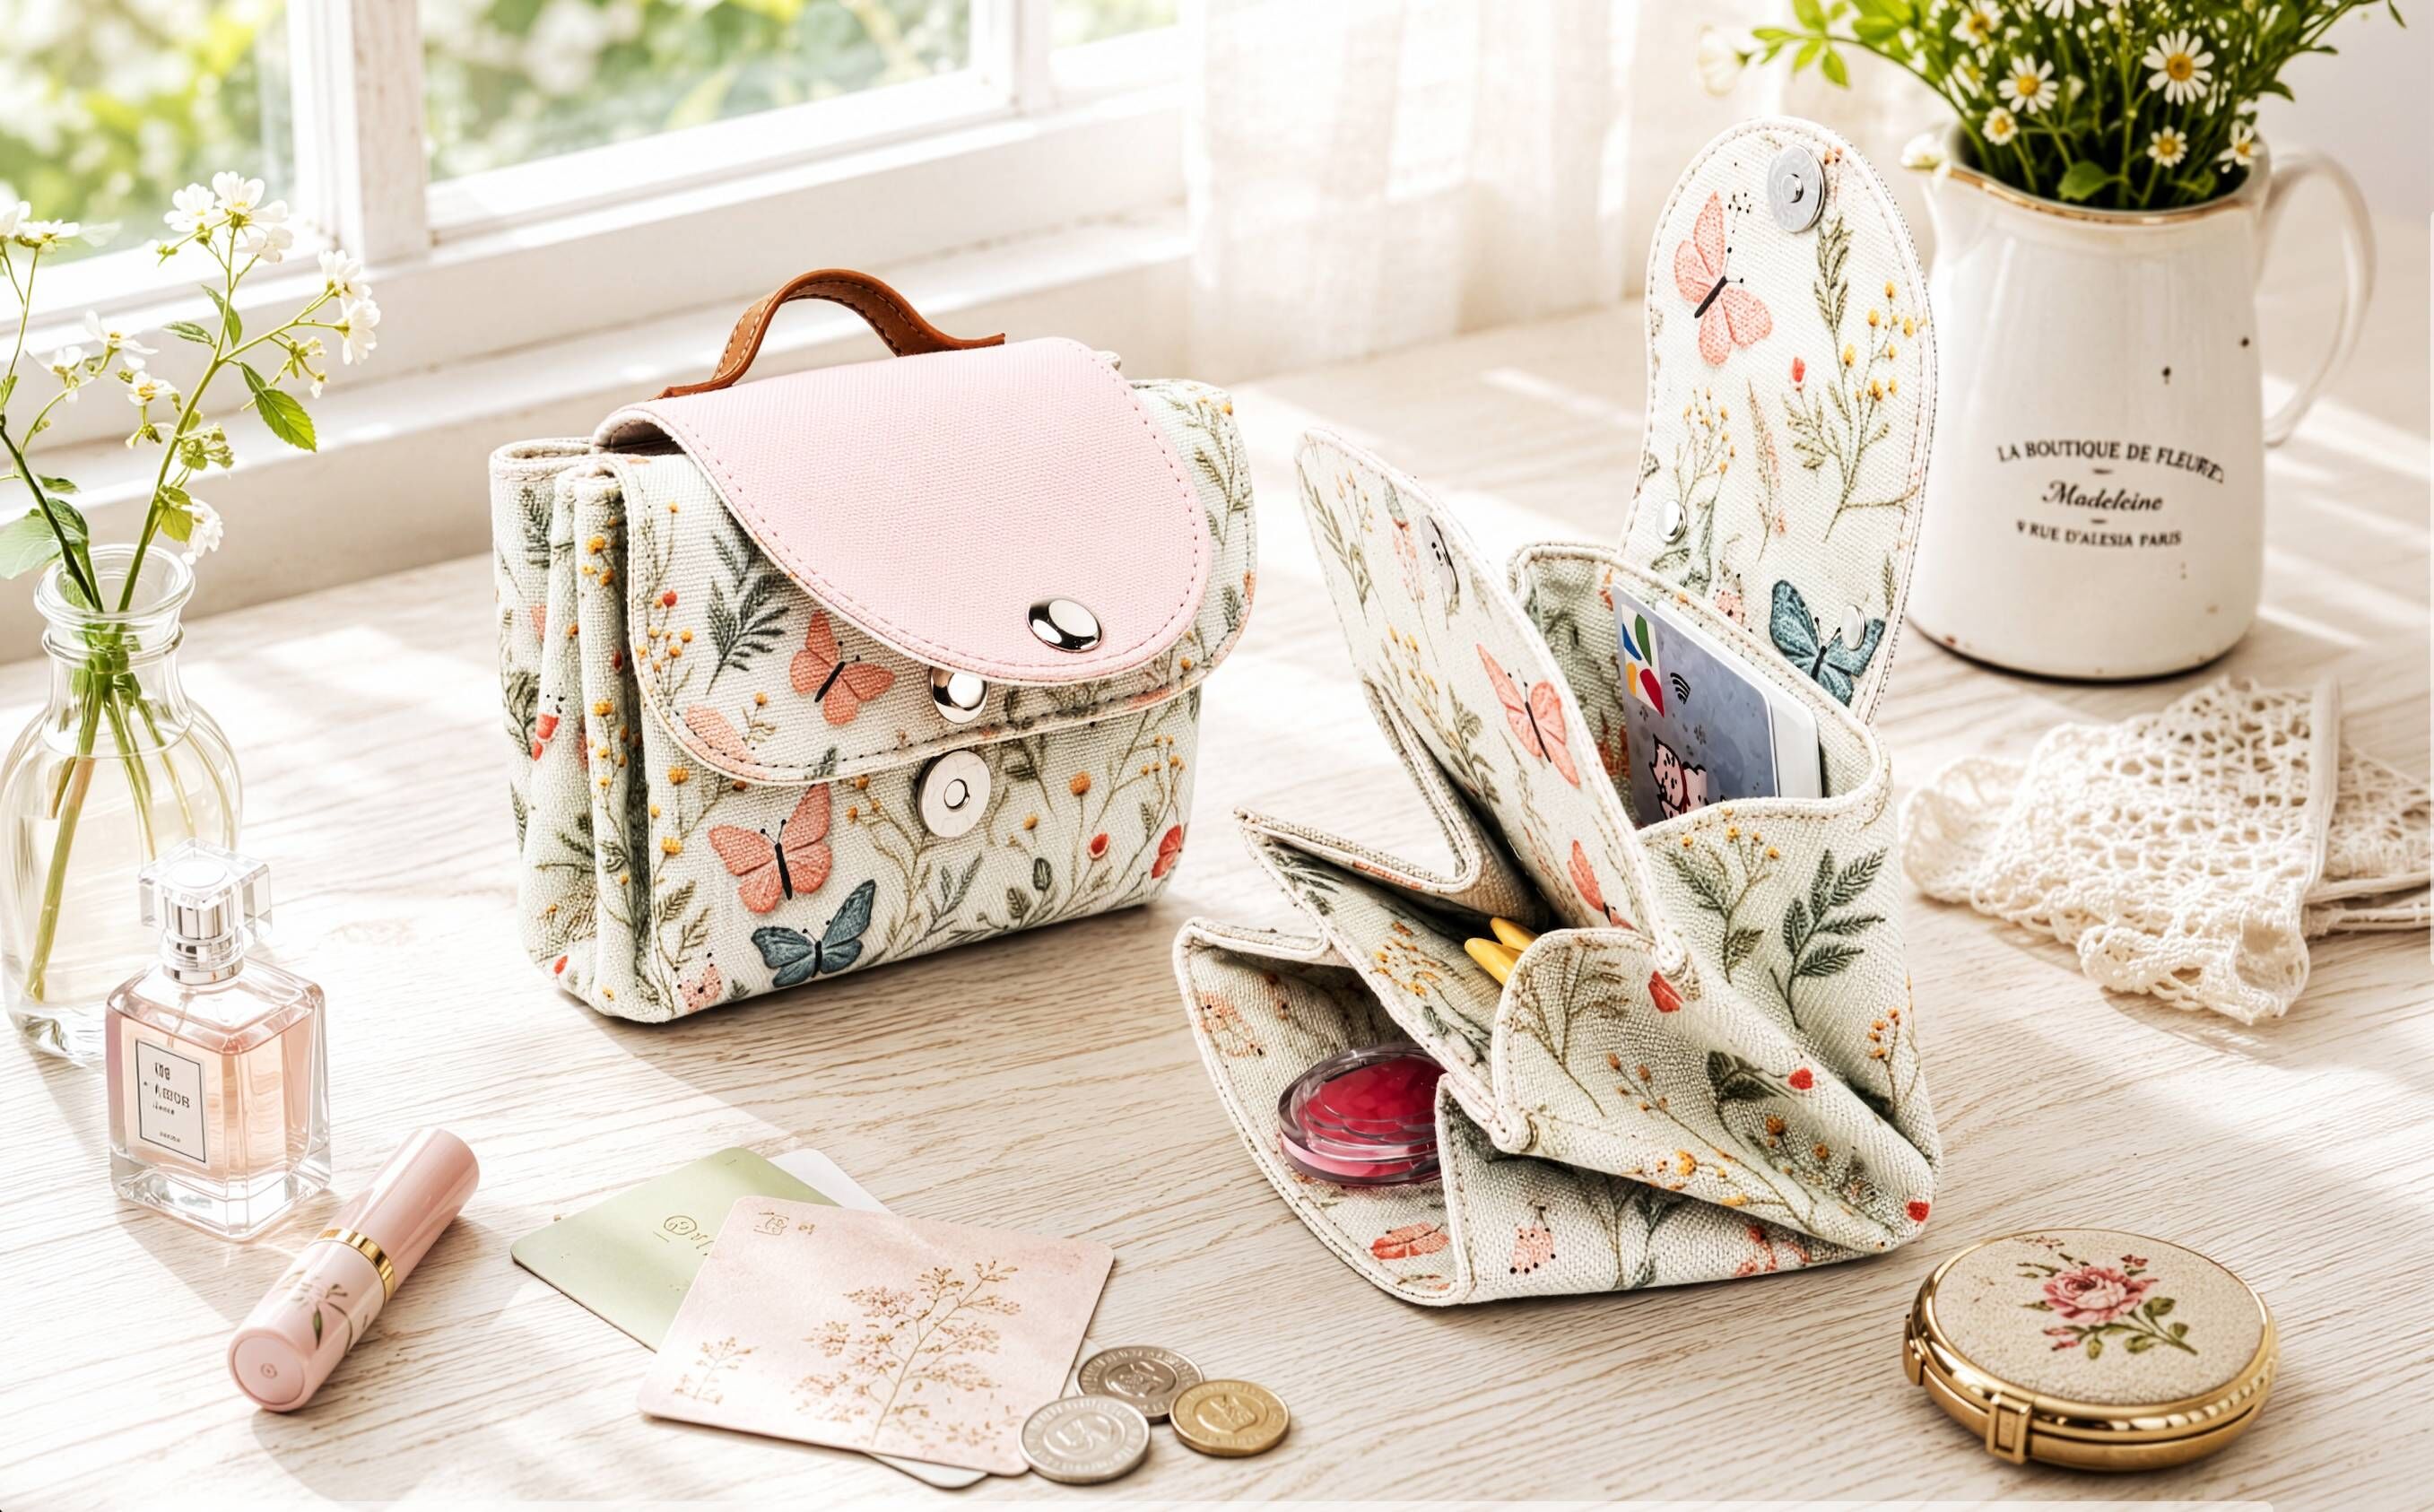
圓弧雙翻蓋、可展開的風琴側邊,加上一只細緻提把,把零錢包做成讓人一眼喜歡的迷你書包。 前後兩層可分開收納零錢、卡片、鑰匙、耳機或唇膏;約 12 × 8 cm 的輕巧尺寸, 放進日常包袋不佔空間,打開時依然清楚好找。
Rounded double flaps, expandable accordion sides, and a petite handle turn a practical purse into an irresistible mini schoolbag. Two separate layers organize coins, cards, keys, earbuds, or lipstick, while the compact 12 × 8 cm size slips neatly into an everyday bag.
跟著蔡梅珍老師依序完成袋蓋、袋身、中間隔層、四個側邊與磁釦。 先看一遍掌握組合方向,再準備材料動手,立體層次會更清楚。
Follow Teacher Tsai Mei-Chen through the flaps, body, center divider, four side folds, and magnetic snaps. Watch once for the assembly order, then sew along with confidence.
材料包包含主要材料、紙型與影片教學,多款花色可選;也可選擇成品訂製。
查看雙層零錢包材料包 →The kit includes the main materials, pattern, and video tutorial in a range of fabric options. A finished custom piece is also available.
View the Double-Layer Coin Purse Kit →先確認袋蓋方向,再建立中間隔層,最後處理四個側邊,複雜的外觀看起來就會有清楚順序。
Orient the flap, establish the center divider, and finish the four side folds in a clear sequence.
先確認正反面與中心位置,將袋蓋對齊袋身上緣,再以車縫固定,讓圓弧翻蓋落在正確方向。
Match the right sides and centers, then stitch the flap to the upper body edge so the rounded cover faces the correct way.
將中間隔層與袋身上、下邊緣車縫固定,先建立兩個獨立收納空間,再進入立體側邊組合。
Stitch the divider to the upper and lower body edges first, creating two distinct storage spaces before shaping the sides.
四個側邊依序向內夾合並車縫;弧度處先剪牙口再翻面,側折更服貼,包型也會更俐落。
Bring each side inward and stitch in sequence. Clip the curved seam allowances before turning for cleaner folds and a neater shape.
像縮小版書包一樣可愛,收納邏輯卻很實用。前層放零錢、票券或常用小物, 後層放卡片、鑰匙或唇膏,雙翻蓋各自開合,不必把所有物品混在一起翻找。
The mini schoolbag shape is charming and genuinely practical. Keep coins, tickets, or frequently used pieces in front, and place cards, keys, or lipstick behind—each flap opens independently.
前後兩個獨立空間,零錢與卡片不再混在一起,取用更直覺。
Keep coins and cards apart in two independent compartments for easier access.
側邊展開後增加容量,也讓袋口看得更清楚,小物不容易躲在角落。
Expandable sides add capacity and open the purse wide enough to see small items clearly.
圓弧蓋片、撞釘磁釦與上方提把,讓實用品也有完整精緻的作品感。
Rounded flaps, magnetic snaps, and a top handle give this useful purse a polished finish.

材料包備有莓果紫紅、櫻花粉、暖冬藍、森林兔、向日葵等多款配色。 主要材料、紙型與影片教學一次準備好,適合想專心享受縫製過程的你。
Explore berry purple-red, cherry blossom pink, warm winter blue, forest rabbit, sunflower, and many other colorways. The main materials, pattern, and video tutorial are prepared for you.
鋸齒剪幫助圓弧縫份順利翻面;14 mm 撞釘磁釦工具則是完成雙翻蓋開合的必備工具。
Pinking shears help curved seams turn neatly, while the 14 mm setting tool is essential for installing both magnetic snaps.
← 左右滑動查看更多 → ← Swipe to explore →

Trim the rounded flap and body seam allowances before turning to reduce bulk and help every curve lie smooth.
View 9-inch Pinking Shears →
This project uses 14 mm rivet magnetic snaps. The dedicated setter aligns both parts securely and is useful for projects of every size.
View Magnetic Snap Tool →材料包作品包含磁釦安裝步驟;若手邊尚無適用工具,建議與材料包一併準備,製作會更順利。
準備 14 mm 磁釦工具 →Magnetic snap installation is part of this project. If you do not already own the suitable tool, add it when ordering your kit.
Get the 14 mm Snap Tool →挑一款喜歡的花色,跟著影片把袋蓋、中間隔層與風琴側邊逐步組合。完成後,零錢、卡片與隨身小物都有各自的位置。
Choose a fabric you love and follow the video through the flap, center divider, and accordion sides. Your coins, cards, and everyday essentials will each have a place.


